Synth Secrets is a series of programming tutorials in which we show how to make a range of classic and new synth sounds using plugins such as Massive, Sylenth and Diva.
In this instalment, we’re going to be looking at how to turn a vocal sample into an evolving synth pad using wavetable resynthesis. We’re using the new wavetable synth layer in the latest iteration of Steinberg’s HALion, but other samplers and synths have include options to achieve similar results.
We’ll be starting with this:
and finishing up with something like this:
STEP 1
To get started, we need to load up HALion 6 and set up our patch. This is an easy process but there are a few steps involved.
The ‘Hexagon’ program is loaded by default, so we need to clear this to initialise the synth. Do this by clicking on the small trash can icon in the program slot rack.

In the dialogue box asking if you’re sure you want to clear all program slots, click the ‘Clear’ button.

In the program table in the lower right corner, give the next blank program in the list (labelled ‘Program 2’ in this case) a new name if you want to. This is easily done by clicking on its name and typing a new one – we’re calling ours ‘Vox Pad’ .

Then drag and drop it across from the program table in the bottom right to the slot rack in the top left.

Next, go to the program tree in the upper right corner and click the Create New Zone button. Select the Wavetable Zone option from the popup menu to create a new Wavetable zone.

Then, in the centre section, select the Edit tab, followed by the Wavetable tab.

At the moment, the sound being produced is just the basic sine wave default. We can use this to program some chords into our MIDI instrument track in Cubase so we can hear how our sound is progressing as we go along. Here’s how the part looks and sounds:

STEP 2
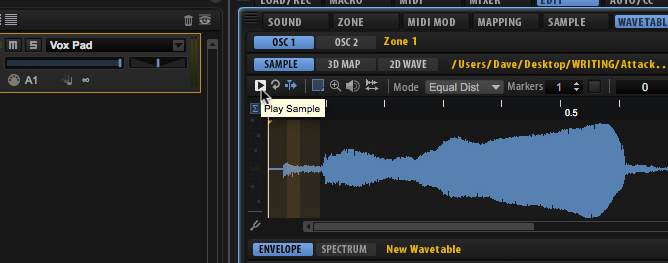
Now it’s time to import an audio file to use as the raw material for our new sound. We drag in our sample, named ‘SS HALion6 Come To Me.wav’ and drop it onto the small waveform icon near the bottom of the screen.

Click the small play button above the sample waveform display to play the sample back. If you play your MIDI keyboard at this point, all you’ll hear is a faint buzz caused by a tiny portion of the quiet area before the start of the vocal looping round rapidly.
STEP 3
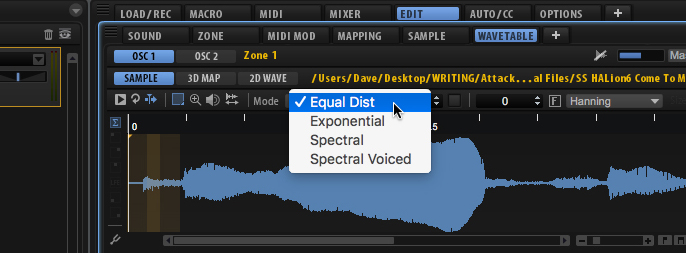
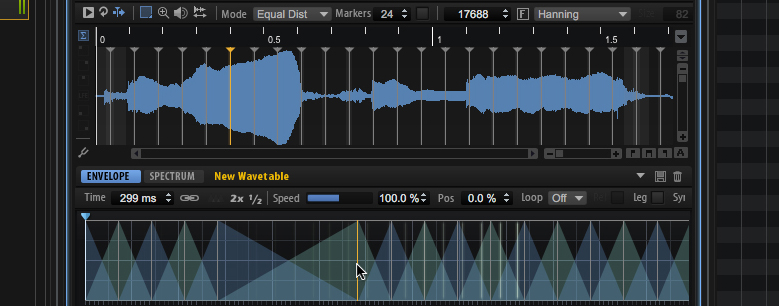
Next, we select a slicing mode – there are four options to choose from, and these determine how the audio file we’ve just imported will be analysed. We’re going with the Equal Dist option. This means that the analysis markers are placed evenly throughout the waveform. Now when you play a note or chord on your MIDI keyboard, you should be able to hear the resynthesised version of the audio file played back at the right pitches.
You can play around with the crossfades and segment lengths if you like, to hear how it affects the sound – do this by dragging the markers left or right in the region below the sample waveform display.
STEP 4
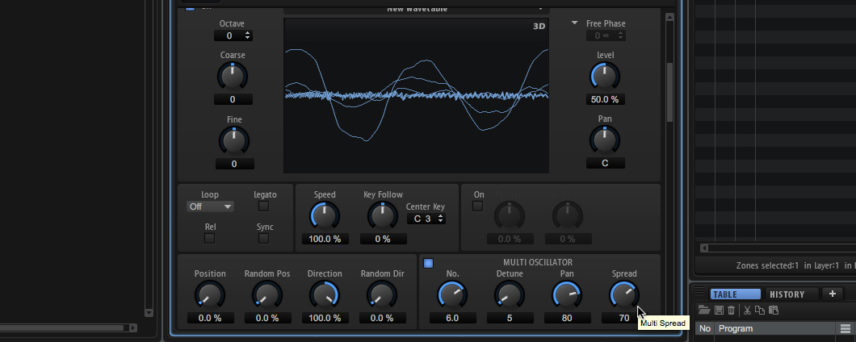
Click the Zone tab to access the synthesis controls for the zone we just created. This is where we can start to shape the sound using a combination of conventional subtractive and wavetable synthesis techniques. Scroll down and enable Multi Oscillator Mode, then start to thicken the sound by setting the number of voices to 6, Detune to 5, Pan to 80 and Spread to 70 as shown.
STEP 5
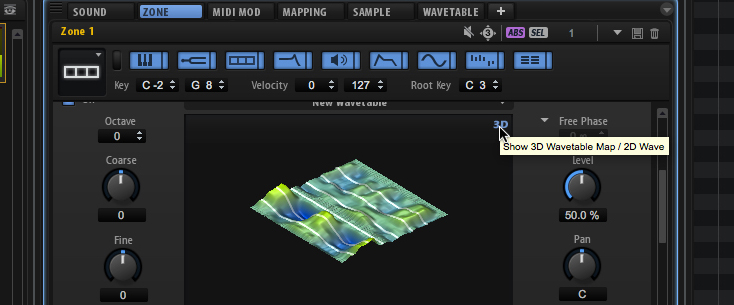
At this point, click the 3D button in the upper right corner of the waveform display to switch to the 3D wavetable display for a bit of a visual feast. As you play the sound, you can see the voices, represented by white lines, sweeping across the 3D waveform as they play through the audio.
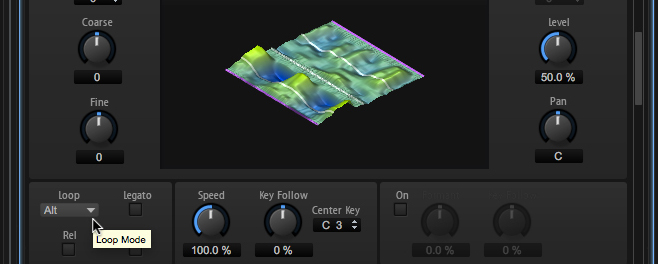
To make the sample loop round for as long as you hold the key down, enable loop mode and select Alt to have the voices play back and forth in alternating directions through the wave as it loops.
To radically change the timbre, enable the Formant Shift function and have a play with the settings. We’ve set it to a fairly moderate -17% here.

STEP 6
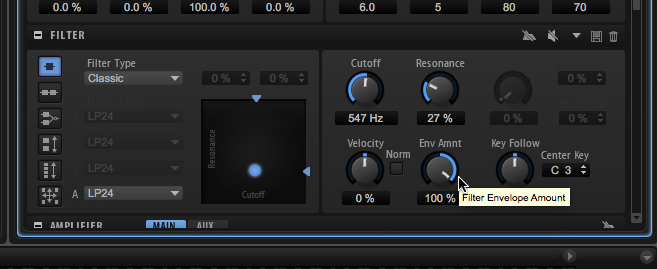
Next, let’s turn to the filter section. Click the blue filter button or scroll down to the section, which is found beneath the Multi Oscillator panel. Enable the filter by selecting the Classic option from the filter type pop-up menu.

Then, in order to tame some of the high frequencies, set the filter controls to the values shown: Cutoff 547 Hz, Resonance 27%, Filter Envelope Amount (Env Amnt) 100%.
Next, let’s use an envelope to shape the sound of the filter. Scroll down to the Envelope section, click the Filter button and adjust the attack of the filter envelope to around 1.5 seconds to add a nice sweep to the front portion of the sound. You can do this either by dragging the nodes on the graph or by typing the values into the fields on the left-hand side. Use the Curve parameter to adjust the steepness of the curve.

STEP 7
To give the sound a more pad-like quality, click the Amp button and adjust the release portion of the amplitude envelope. This will make the sound tail off more slowly after the keys are released. We’ve gone for a setting of 1375 ms here, with a curve of -7.5, which is about right for our part.

STEP 8
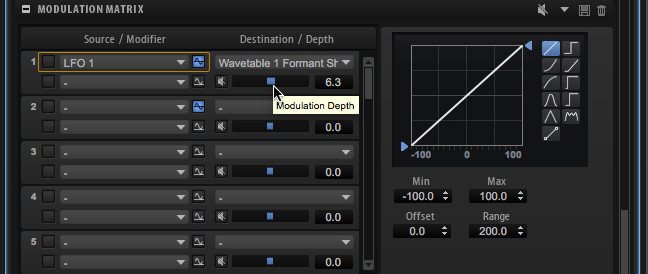
The modulation matrix is where we can set up ways to change (or ‘modulate’) the sound as it progresses, by routing different modulation sources (such as envelopes, LFOs or the mod wheel) to different destinations (such as filter cutoff, oscillator pitch or LFO depth). Enter the modulation matrix by clicking the the rightmost blue button at the top of the centre panel.

Setting up a modulation is simple – just select a source and a destination from the popup menus, then use the blue slider to set the depth of the effect. Here, we’ve assigned LFO1 to modulate the formant shift of our wavetable oscillator to add a hint of movement to the sound.
STEP 9
Our sound is just about done, but to finish things off, let’s apply some effects. Click on the Program bus in the Program Tree, then on the blue Mixer tab in the centre panel. Click the first of the eight empty effects slots that contain the word None. This will bring up a palette of effects processors.

We’re going to add a splash of delay to proceedings, so we click the triangle next to Delay in the list and select a Multi Delay plugin.
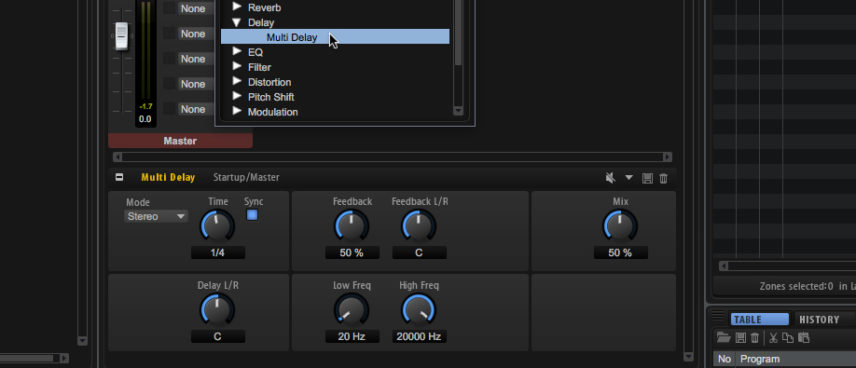
This will reveal the control panel for the delay effect. The default setting is a little over the top for our needs, so we dial back the Feedback control to 15% and the Mix to 20%. We also roll off the bottom end of the repeats by setting the high-pass filter value to 500 Hz – this should help to avoid the effect taking up too much space in a mix. Job done!
