MNTRA FLTRS combines 37 filter algorithms with a unique, graphic-based macro system. Here’s how to get the most out of it.
MNTRA Instruments is back again, this time with a new effect plugin called FLTRS. As the name suggests, it’s a filter effect, but this is not your usual lowpass/highpass/bandpass affair. Instead, FLTRS takes cues from the developer’s other releases, including MNDALA 2, its flagship instrument, incorporating a unique, graphic-based workflow that uses a system of macros to provide control over typical parameters like cutoff and resonance but also modulation, drive, and an envelope filter, with additional controls and a mastering section on hand as well.
FLTRS isn’t complicated – far from it – but it is rather unique in how it goes about things. This walkthrough will help you get to grips with the plugin and offers some tips on how to get the most out of it.
Along the way, we’ll show you how to go from a clean track like this:
To one with grit, character, and motion like this, with FLTRS on every channel:
[quote align=right text=”this is not your usual lowpass/highpass/bandpass affair”]
Overview: A Bird’s Eye View of FLTRS
As previously stated, FLTRS is a filter plugin, and part of MNTRA’s effects collection that also includes BRUITAGE, a distortion plugin, and BOREALIS for reverb. Along with MNDALA 2, they all incorporate a unique graphic-based workflow centered around three axes, which you engage with as macros.
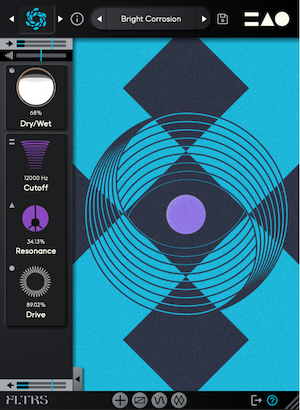
When you launch FLTRS, you’re greeted by the Perform View, which is a visual representation of the X, Y and Z axes. Each axis is coded with a shape, either a circle, triangle, or an equal sign. Move your mouse over the graphic and you’ll see your cursor change to one of these symbols. By clicking and dragging, you’re controlling all of the parameters linked to that macro. You’ll also see the associated parameters and current amount percentage displayed at the bottom.
On the left is the Control Panel with the basic controls for the selected algorithm (more on this next). Main parameters will generally include cutoff, resonance and a third one, although these can change depending on the algorithm. You’ll also have a dry/wet control, input and output gain at the top and bottom (respectively), as well as envelope follower input. You can hide the Control Panel by clicking on the arrow tab located at the bottom.
Additional pages include the Animod modulation section, mastering section, and additional parameters (if available). You can access these by clicking on the icons at the bottom of the screen.
Selecting An Algorithm
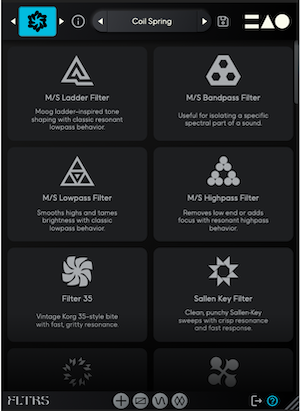
FLTRS offers 37 different filter algorithms, each with a preloaded combination of a filter and other effects. These incorporate classic analog filters like the Moog-style Ladder filter, Korg’s MS-20 filter, a Sallen Key filter, and your usual lowpass, highpass, and bandpass models. Additionally, there are three more synth-inspired filters, including Jupiter-6, Juno and a modern OTA style. For something a little wilder, there is a selection of experimental and spectral filters as well.
To choose one, click on the algorithm logo in the upper left of any screen. You’ll be taken to the effect browser, where you can read about each algorithm. Alternatively, you can click on the arrow on either side of the top logo to scroll through them.
Note: Some algorithms contain a page of additional parameters. Click the plus icon tab at the bottom to access these.
A great way to hear what each filter has to offer is by working your way through the Elements list in the preset browser. These are the basic starting presets for each algorithm with no additional modulation applied. As there’s no init preset, think of the Elements as starting points.
Here are three Elements presets in action on the same synthesizer track.
First, the track on its own:
Next, with the Feedback Mesh Filter applied:
And the Odysseus Filter:
Finally, the Sallen Key Filter algorithm:
[quote align=right text=”FLTRS isn’t complicated – far from it – but it is rather unique in how it goes about things”]
Working With Macros
Next, let’s look at how to work with macros, which are at the heart of FLTRS and its workflow.
Start by navigating to the Perform View. If you’re not already there, you can click on the three icons in the upper right corner for quick access. Now, looking at the control panel, you’ll see that each parameter has a small icon to the left of it. This indicates which macro axis it belongs to.
Click on an icon, right-click on a parameter, or use the tab at the bottom to reveal the Control Mapping Window. The tables here control the range and response of the macro mapping.
Each table displays the axis macro associated with it (represented by the highlighted icon below it) as well as an envelope showing how the effect changes throughout its range. You can alter the shape of the envelope by clicking on it. Select the square in the lower right to open a larger view and reveal more envelope shapes.
You may have noticed two additional icons next to the three axes. These are for manual control (the hand icon) and modulation, which we’ll address next.
Top Tip: You may be tempted to click and drag on a parameter graphic, such as cutoff or resonance, but unless it’s assigned to manual control, no change will take place. Switch it to the hand graphic to make direct changes.
Along with mouse control, you can also automate the macros, as in this audio example, with the cutoff of a lowpass filter closing over time.
Automated macro change:
Assigning Modulation
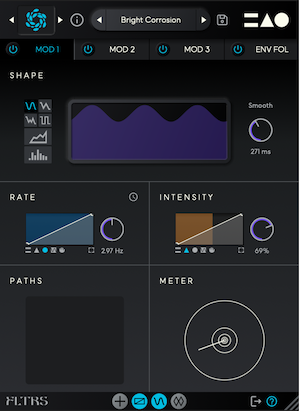
FLTRS includes a comprehensive modulation section called Animod, comprising three complex modulators plus an envelope follower. Click on the Animod tab at the bottom of any screen to access the page.
Let’s look at the modulators first. Each of these offers different wave types, including sine, triangle, square, and random. You can alter the shapes using the table associated with the parameter. There’s also a step modulator for sequenced modulations.
Each modulator has its own rate and intensity sections. As with the Control Panel parameters, these both have their own table, which you can assign to one of the three axes, to manual control, or to another modulator. For example, you could use the LFO in Modulator 2 to affect the rate of Modulator 1 for an LFO that speeds up and slows down periodically.
In the following audio example, the intensity of the Offset effect modulation is in turn being modulated by another LFO.
Modulation on modulation:
Each modulator also includes a Paths table to show you what destinations it’s assigned to, as well as a meter for visual feedback.
The Envelope Follower
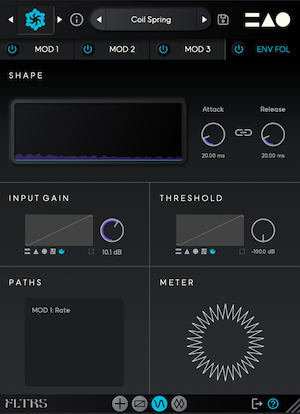
An envelope follower is a modulation source that responds to an input signal (Live users are likely familiar with the Envelope Follower built into Live, and this works in a similar manner). It works particularly well on transient-heavy material like drums and basslines. An obvious use for it is to trigger the cutoff but really, anything goes.
The envelope follower here includes a threshold control. Use the graphic of the input signal in the Shape monitor to fine-tune your threshold point. Alternatively, set the threshold to be triggered by another modulator or a macro for more unusual shapes.
Other controls include attack and release, which can be linked together with the chain icon, as well as input gain. Note that there’s an additional input gain slider in the Perform View control panel.
Here we’ve manually set the envelope follower threshold to fire on transient peaks in this bassline and pull down on the filter cutoff.
Following the envelope:
Mastering Section
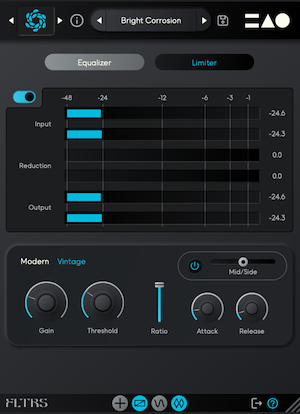
The last stop for the signal before it leaves FLTRS is the Mastering Section. This includes a parametric equalizer for tone shaping, and a mastering grade compressor/limiter with two modes, modern and vintage.
FILTRS is available at a special launch price of $49 until May 14th. Find out more here.
[social-links heading=”Follow Attack Magazine” facebook=”https://www.facebook.com/attackmag” twitter=”https://twitter.com/attackmag1″ instagram=”https://www.instagram.com/attackmag/” youtube=”https://www.youtube.com/user/attackmag” soundcloud=”https://soundcloud.com/attackmag” tiktok=”https://www.tiktok.com/@attackmagazine”]
[product-collection]