In this Tutorial, we show you the first steps in applying swing to your track.
Whether it’s Daft Punk’s Around The World, Fred Again..’s adore u, Larry Heard’s Burning 4 You, Jonasu’s Black Magic, or Daydream Affiliate’s 99 Eyes, swing injects a track with bounce, snap, and lively energy that straight beats lack.
In this guide, we’ll break down the theory of swing, then show you how to add this feel to your own tracks step-by-step.
Note: We are using Ableton Live to demonstrate swing but you can follow the same techniques in your preferred DAW.
What Is Swing?
Simply put, swing shifts the weak beat in every pair away from the grid by however much we decide.
Begin by taking a rhythm that’s equally spaced, like a hi-hat part playing 16ths (Fig. 1). Even with equal velocity, there’s a strong / downbeat and a weak beat to each pair. That second (weak beat) happens exactly halfway between the downbeats (or precisely on the grid); this could be called a ‘50% swing’, but it’s more commonly known as ‘straight’.

Now take that weak beat and increase the time it takes to get there from the downbeat. Move that second note to the right on the piano roll, off the grid (Fig. 2). You’re now hearing a higher-than-50% difference between down and weak beats; what you’re hearing is ‘swing’.

How much you moved it, that’s its swing percentage.
Here’s a simple beat played straight.

At 52%:

At 64%:

At 73%:

You’ll hear very little difference between straight and 52%, but that 2% delay adds a subtle ‘feel’ to the hi-hat. At 64%, the swing becomes clear, and at 73% even more so.
Take note, all that’s changed between any of these is the position of each ‘weak’ hi-hat beat, the second in every group of two. Look at the screenshots, and you’ll see that the gap is increasing, but the rest of the beat remains the same.
Side note: We normally associate swing with a ‘positive’ movement – one that delays the weak beat, moving it to the right on the piano roll, increasing that percentage. But you can move that weak beat earlier, to the left, decreasing the percentage. Moving notes to a less than 50% swing value is referred to as a ‘negative’ swing and creates an anticipatory, more rushed feel.
The Groove Pool
Manually shifting every weak beat is cumbersome – thankfully, Ableton’s Groove Pool handles this for you. Here you can apply a reimagining of Ableton’s grid to your clip. In other words, instead of moving the notes in your pattern off the grid, you move the grid itself.
Start by programming a beat like the one below. Use any drum kit – we’re using the 808 Core Kit with the 808 Shaper preset on Saturator and the default Drum Buss (Fig. 7).
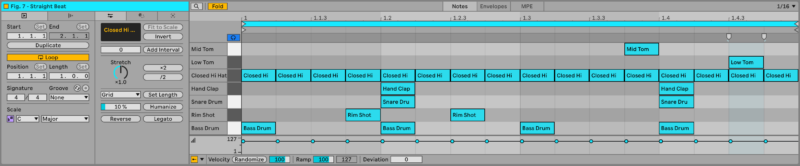
Next, drag the Swing 16th 64 Groove from the Grooves section of Ableton’s browser into your Groove Pool. Drag that Groove onto the clip we just made. Start by setting all the percentages for that Groove to 0% and turn the Global Amount to 100% so we can isolate the timing effect (fig. 8). With everything on the Groove at 0%, you’ll hear that it’s made no difference.
Now change the Timing percentage to 100%, and you’ll hear it. Your beat is swinging.
Note: Don’t hear any swing? Check that Live’s Global Groove Amount is set to 100%. This control is separate from your groove’s timing settings, so even if the groove is applied correctly, a lower global amount will reduce or remove the swing effec
How much is it swinging? Since we used the Swing 16th 64, we know it’s swinging at 64%. So 100% on the Groove Pool’s Timing is the ratio of how much towards the ‘full’ groove your beat is. At 100% Timing, the Groove is applied 100%, so 100% equals (in this example) a swing of 64%. At 50%, that movement reaches halfway to the full 64%, and so on.
Notice that while your beat sounds different, it doesn’t look different. Above, we explained how manually moving each weak beat later in time would generate a swing feel. Applying the groove from Ableton’s groove pool has saved you that work by shifting your entire grid. The notes sound off the grid but visually stay on the grid, making it much easier to programme. Below, the beat appears as the top pattern on the piano roll, but plays as the lower pattern (Fig. 9).
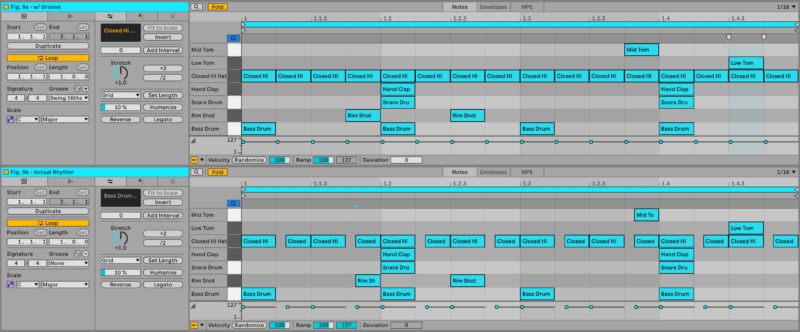
Every weak beat has moved later – the rim shot, mid tom, and hi-hats all shift together. Jump back to the earlier straight example, and you’ll hear that it’s added a bouncy energy to the beat.
The Groove Pool’s Base, Quantise, Random and Velocity settings are all worth exploring separately as they too begin to shift how an otherwise static, ‘on the grid’ clip could ‘feel’. They open another dimension we haven’t explored in this article.
Where to go from here?
You know what swing is and how to easily apply it to your programming. Try adding different amounts of swing to different elements of your track. Drag different Grooves to the pool and apply them in different amounts.
We’ve focused on the drums here because it’s an easy way to quickly identify rhythmic changes, but adding that same shift in the grid to your lead sound, sample chops, bass line, or any element is a powerful tool. Here’s a quick demo with swing applied to every element.
Next time you listen to Around The World or adore u, try to hear where those weak beats are sitting – once you can hear it, you’ll start noticing it everywhere.
To apply this: Open an unfinished project, pick a groove, and apply it to the drum and bass parts. Alternatively, click a drum voice, hold Command (Mac) / Ctrl (Windows), and drag it off the grid.
Don’t have Ableton Live? Buy it here. Heads up, it’s an affiliate link. If you buy through them, we may earn a small commission (it doesn’t affect the price).
[social-links heading=”Follow Attack Magazine” facebook=”https://www.facebook.com/attackmag” twitter=”https://twitter.com/attackmag1″ instagram=”https://www.instagram.com/attackmag/” youtube=”https://www.youtube.com/user/attackmag” soundcloud=”https://soundcloud.com/attackmag” tiktok=”https://www.tiktok.com/@attackmagazine”]
[product-collection]