VocAlign 7 is the latest version of the popular and long-running vocal alignment software. It’s as good as you expect, but does version seven bring enough new features to the table to make it worth the upgrade?
Since 1995, Synchro Arts have been making vocal alignment a little easier with VocAlign. The industry standard software is now up to version seven with what Synchro Arts is calling the biggest workflow shift since the original debuted more than 30 years ago. The big new feature? Everything is now contained inside a single screen, with guide tracks, dubs and outputs all clearly visible at once. It’s a big change since we last checked in at version five, but is it enough to warrant the upgrade price?
What’s New in VocAlign 7
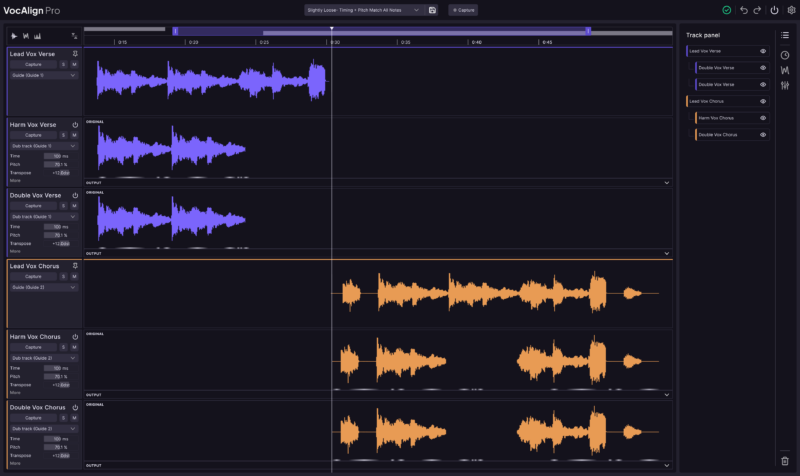
If you’re unfamiliar, VocAlign is a vocal alignment plugin that snaps multiple tracks of audio to a guide. This is useful for lining up vocal doubles and harmonies. Of course, you could always do this manually but VocAlign handles it so quickly and effortlessly. If you work with vocals often, it’s pretty much a required piece of software. This is why it has become the industry standard.
Not content to rest on their laurels, Synchro Arts have worked over the years to improve the software, adding creative functionality like formant and pitch adjustment along with timing. This latest version revamps the workflow so that it’s much more convenient to work with, putting everything onto a single screen.
There are two versions of VocAlign 7, Standard and Pro. We’re looking at Pro.
VocAlign 7: An Overview
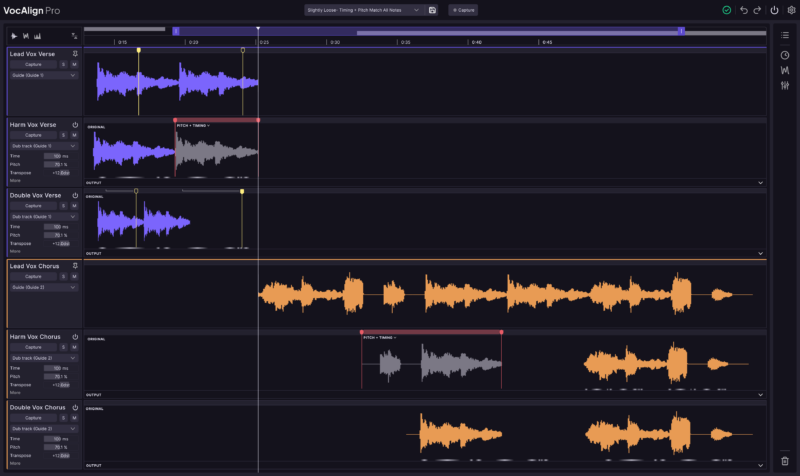
Start by dropping VocAlign onto every track that you want to affect. It’s most commonly used on vocals but it works just as well on instrument and dialogue tracks. Open one instance and all others will be reflected inside any one plugin, with each track appearing sort of like a mini DAW, each with its own solo and mute buttons. Arm and capture the audio, and then set which track is the guide and which are the dubs, the ones to follow the master timing and/or pitch. Automagically, everything is now tight and in tune and ready for any further adjustments you may wish to make. Note that you can have multiple guides as well, keeping everything within one tidy layout.
Adjustments can apply globally, but also now individually to each track or even to separate clips within a track. On the left are the track settings, with pitch, timing and formant controls to change everything in that lane, while on the right are clip settings. You can easily give one single dub looser timing than the rest of the harmonies, and apply radical formant changes to just one clip within that track. Or highlight a section to protect it from any changes to ensure the naturalness of a comp remains. All of this is extremely intuitive in use as well.
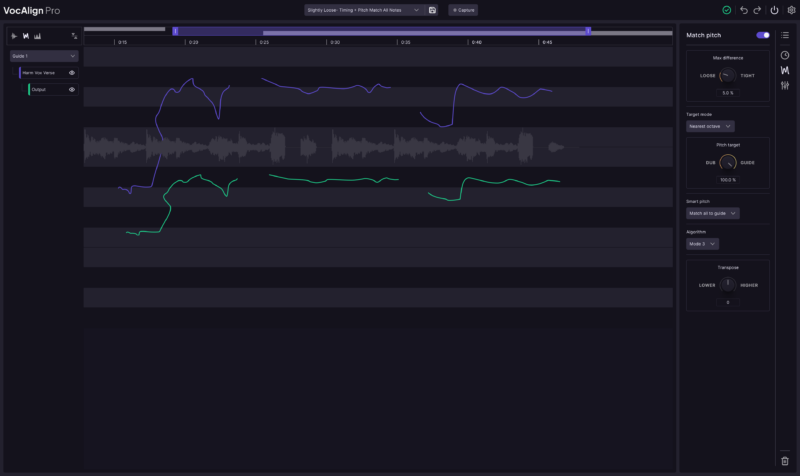
VocAlign 7 has a new analysis view called Visual Energy. With this, you can readily see not only how the output audio aligns with the original but its “energy” in terms of amplitude. You can also check pitch changes, although you can’t edit notes at a granular level. For that, you’ll need RePitch 2, which syncs with VocAlign via SynchroLink 2.0 to act as the guide, with its information also showing up in VocAlign.
Previous and trusted algorithms have been carried over from previous versions as well, like Smart Pitch, which knows when backing vocals could use some pitch correction and applies it only where needed.
VocAlign 7 In Use
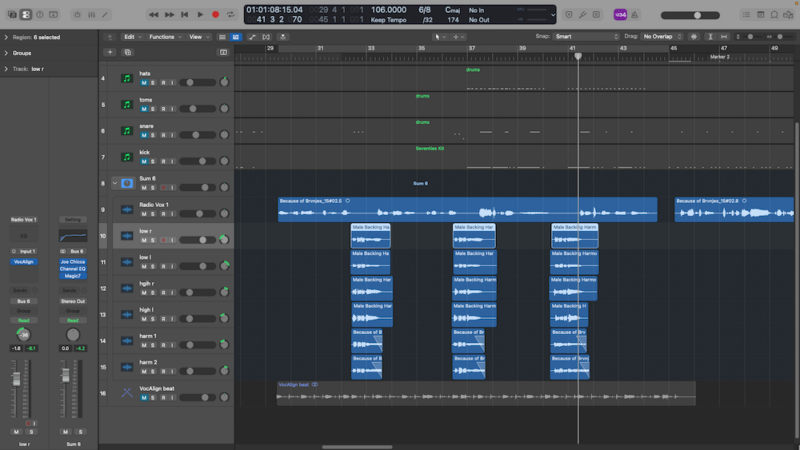
Let’s take VocAlign 7 for a spin and see how it works in three use cases: with vocals, with an instrument, and creating a layered impact sound.
First, we try it out with vocals, arguably the most common way that you’ll employ it. We have a main vocal plus six tracks of harmonies doing a kind of call-and-response. We’ve purposely moved the harmonies off-grid to see how the software responds in an extreme situation.
Here’s how it sounds with no processing:
We add VocAlign 7 to every track and capture the audio. We’re using Logic Pro 12 on an M4 Mac mini, which frustratingly can’t run ARA plugins without opening in Rosetta. Instead of doing that, we capture the audio in real time. Once done, we set the first channel to be the guide and the subsequent tracks as dubs. We highlight all dub tracks and go with the preset “Slightly Loose – Timing + Pitch Match All Notes.” Instantly, everything is snapped together nice and tight, with clean and natural pitch correction aligned to the guide track throughout.
The processed vocal result:
Next, let’s see what it can do with an instrument. We’re as interested in seeing how it can creatively alter the sound as tighten multiple takes up, so we drop the same sample of a jazz guitar onto two tracks and slightly offset the second.
Here’s how that sounds:
We next add VocAlign 7 to both guitar tracks, capture the audio, and align the two takes. We then transpose the second down 5 cents for a slight harmony.
Processed guitars:
Finally, let’s see how it handles multiple impacts, the kind you layer up for a big cinematic sound.
Here are the three sounds haphazardly dropped onto the DAW timeline:
We go through the same process of capturing audio and assigning tracks. This time, we set slightly different presets for each of the two dubs, one with tight timing and one slightly loose. Since we’re working with largely inharmonic material, you can hear some interesting artifacts generated in the tail as the algorithm tries to match pitch. Some real potential for creative sound design here. You can easily get around that by turning off pitch changes.
The finished impact:
Is VocAlign 7 Worth It?
VocAlign 7 does what it promises: it aligns vocals with no muss and no fuss. The new workflow improvements are a long time coming and extremely welcome. You have to wonder why it took them 30 years to get it all under one roof. But no matter why. The fact that it exists now is all that matters. This makes what is already a time-saving utility into one that is even more so. The new granular controls over track and clip processing are excellent as well. It’s great to see the workflow improved for Ableton Live and FL Studio users. No more annoying sidechain input. We also love that there are no track limits in version seven. You’ll wonder how you ever got along without it. We should note that we had some issues with the new VocAlign in Ableton Live 11. It’s great that you no longer need to sidechain but it felt a little buggy, with some functionality not always working properly. Logic Pro 12 running the non-ARA version also turned up some bugs. Hopefully these are issues that will be addressed in a future update.
And now for the $100 question: should you upgrade from version six? That’s how much the upgrade costs, $100. That’s a tougher question to answer. If you spend a lot of time working with vocals, these workflow improvements may be worth it to you. New customers also have a steep entry fee of $199 to consider. It does seem expensive, but then again, how much is convenience worth to you? Of course, if you’re a top-tier LANDR subscriber, VocAlign 7 Pro is included in your subscription, and that’s a no-brainer.
[rating buy=”Synchro Arts VocAlign 7 Pro” price=”$199 ($99 upgrade)” link=”https://www.synchroarts.com/vocalign” value=”4″ versatility=”4.5″ sound=”5″ ease_of_use=”4.5″ overall=”4.5″ text=”VocAlign 7 is a must-have if you spend a lot of your life working with vocals.”]
[social-links heading=”Follow Attack Magazine” facebook=”https://www.facebook.com/attackmag” twitter=”https://twitter.com/attackmag1″ instagram=”https://www.instagram.com/attackmag/” youtube=”https://www.youtube.com/user/attackmag” soundcloud=”https://soundcloud.com/attackmag” tiktok=”https://www.tiktok.com/@attackmagazine”]
[product-collection]